
안녕하세요.
어김없이 2024년이 밝았습니다.
새해부터는 좀 더 자주 좋은 내용으로 포스팅 하겠다는 의지로 열심히 해보겠습니다.
오늘 소개해드릴 내용은 pkg 모듈을 이용한 SEA(Single executable applications) 빌드입니다.
SEA는 nodejs를 설치하지 않고도 nodejs로 만든 프로그램을 실행할 수 있게 해주는 기능입니다.
nodejs 21에서 SEA를 지원하기 시작했습니다. https://nodejs.org/api/single-executable-applications.html
다만 아직은 실험적인 기능이고, 따로 설정해야 하는 게 많은 관계로 이번 시간에는 언급하지 않겠습니다.
앞서 말씀드렸듯이 오늘 SEA로 빌드하는 데 사용할 모듈은 vercel에서 개발한 오픈 소스인 pkg입니다.
vercel이 익숙하신 분이라면 아마 react를 접해보신 분일 것 같네요.
그 유명한 next.js를 만든 곳입니다. (vue 진영에선 next.js에 영감을 받아 nuxt.js가 개발되었죠)
pkg 모듈에서 ESM(ECMAScript Modules)으로 빌드하려면 forked된 다른 모듈을 사용해야 한다고 합니다.(추천하고 있음)
- ESM과 CJS의 차이점은 https://nodejs.org/api/esm.html#esm_differences_between_es_modules_and_commonjs 에서 확인할 수 있습니다.
- 다음 기회에 javascript의 모듈 시스템에 대해 포스팅하는 시간을 가져도 좋겠네요
오늘은 https://github.com/vercel/pkg 에서 제공하는 모듈을 사용하기때문에 CJS(CommonJS)로 빌드하겠습니다.
리서치 회사답게 설문지 yaml 파일을 읽어서 사용자 입력으로 응답을 받는 CLI를 만들어 pkg로 빌드해보겠습니다.
app.js
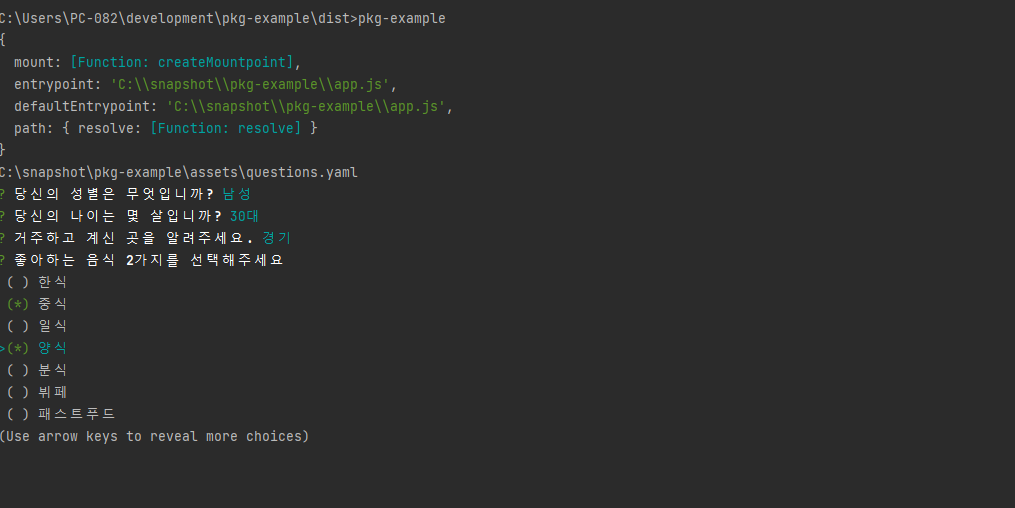
설문지 내용이 들어 있는 yaml파일을 읽어서 사용자 입력을 받습니다. 오늘 주제에서는 크게 중요하지 않습니다.
const { select, checkbox } = require('@inquirer/prompts');
const { parse } = require('yaml');
const fs = require('fs');
const path = require('path');
(async () => {
    function convertOptions(options) {
        const { label, value, description } = options;
        return { name: label, value, description: description || label };
    }

    function generateQuestions(question) {
        const { index, content: message, options, type } = question;
        if (type === 'checkbox') return checkbox({ message, choices: options.map(convertOptions) });
        return select({ message, choices: options.map(convertOptions) });
    }

    const assetsPath = path.join(__dirname,'assets/questions.yaml');
    const { questions } = parse(fs.readFileSync(assetsPath, 'utf8'));

    for (const question of questions) {
        const { index, content: message, options, type } = question;
        const answer = await generateQuestions(question);
    }
})();
question.yaml
설문 내용이 들어있는 yaml입니다.
questions:
  -
    index: "SQ1"
    type: "radio"
    content: "당신의 성별은 무엇입니까?"
    options:
      - label: "남성"
        value: 1
      - label: "여성"
        value: 2
  - index: "SQ2"
    content: "당신의 나이는 몇 살입니까?"
    type: "radio"
    options:
      - label: "10대"
        value: 1
      - label: "20대"
        value: 2
      - label: "30대"
        value: 3
      - label: "40대"
        value: 4
      - label: "50대"
        value: 5
      - label: "60대 이상"
        value: 6
  - index: "SQ3"
    content: "거주하고 계신 곳을 알려주세요."
    type: "radio"
    options:
      - label: "서울"
        value: 1
      - label: "경기"
        value: 2
      - label: "인천"
        value: 3
      - label: "강원"
        value: 4
      - label: "충북"
        value: 5
      - label: "충남"
        value: 6
      - label: "대전"
        value: 7
      - label: "경북"
        value: 8
      - label: "경남"
        value: 9
      - label: "대구"
        value: 10
      - label: "울산"
        value: 11
      - label: "부산"
        value: 12
      - label: "전북"
        value: 13
      - label: "전남"
        value: 14
      - label: "광주"
        value: 15
      - label: "제주"
        value: 16
  - index: "Q1"
    content: "좋아하는 음식 2가지를 선택해주세요"
    type: "checkbox"
    options:
      - label: "한식"
        value: 1
      - label: "중식"
        value: 2
      - label: "일식"
        value: 3
      - label: "양식"
        value: 4
      - label: "분식"
        value: 5
      - label: "뷔페"
        value: 6
      - label: "패스트푸드"
        value: 7
      - label: "기타"
        value: 8
package.json
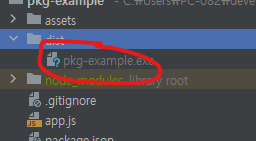
bin과 pkg를 참고하시면 됩니다. 윈도우 뿐아니라, linux, macOS도 지원합니다. pkg에 outputPath를 지정해주었고 dist 디렉토리에 pkg-example.exe가 빌드됩니다. 파일명은 name을 따라갑니다.
{
  "name": "pkg-example",
  "version": "1.0.0",
  "description": "",
  "main": "app.js",
  "bin": "app.js",
  "scripts": {
    "test": "echo \"Error: no test specified\" && exit 1",
    "dev": "node app.js",
    "build": "pkg ."
  },
  "pkg": {
    "targets": ["node18-win-x64"],
    "outputPath": "dist",
    "options": ["experimental-modules"],
    "scripts": ["app.js"],
    "assets": ["assets/**/*"]
  },
  "author": "",
  "license": "ISC",
  "dependencies": {
    "@inquirer/prompts": "^3.3.0",
    "pkg": "^5.8.1",
    "yaml": "^2.3.4"
  }
}
아래는 빌드 과정입니다. 간단합니다.
> npm run build

> pkg-example@1.0.0 build
> pkg .

> pkg@5.8.1

Process finished with exit code 0
빌드가 완료되면 아래와 같이 생성됩니다.
실행 결과
이상으로 pkg 모듈을 이용한 SEA 빌드 방법에 대해 공유드렸습니다.
간단하게 빌드 후 배포할 수 있어서 개인적으로는 굉장히 유용하게 쓸 수 있겠네요.
전체 코드는 https://github.com/pmirnc-dev/pkg-examples에서 확인하실 수 있습니다.